Using nikto to find vulnerabilities

Nikto

What is Nikto? Nikto is a server scanner that is able to scan potentially dangerous files, check outdated version of a software, and checking index files on a server. For more information about Nikto, you can find it on its official github right here

https://github.com/sullo/nikto

Steps:

  1. Open up kali linux machine
  2. Nikto is pre-installed on a kali linux OS based machine, to use it, type
    nikto -h

  3. To run the scan, type the following command on your terminal
    nikto -h target.host.ip.address

    the target host ip address can also be changed to the website address

Using Google to find sensitive information

Google

Google is a search engine that queries what the user search and find it throughout the whole internet. It can also be used by hackers to find sensitive information related to the target. The term that is used for google hacking is google dorks.

Steps:

  1. Open your browser and type google.com
  2. As cited on wikipedia, this are the most popular google dorks query on google.
    You can use this to find sensitive information, such as passwordlist, for example, by typing

    index of:password
  3. You will find all related query on the result list


Brute Forcing WordPress website using wpscan

Steps:

  1. Open up kali linux terminal
  2. Type this command to brute force password on the wordpress admin login
    wpscan –url TARGET.WEBSITE.COM -P PATH/TO/PASSWORD -U USERNAME

    In this case, i put my wordlist on a file named password.lst and the username @user3

  3. It will run all the combinations of the username with all the word on password list
  4. If it matches, it will later notify the password

Using WPScan to find user on a WordPress based website

WPScan

What is wpscan? WPScan is a wordpress vulnerability scanner. It has many usage, among those the most useful are enumerating user, finding vulnerabilities, and brute forcing password on a wordpress site.

Steps:

  1. Open up Kali Linux terminal
  2. To enumerate user, use this command and press enter
    wpscan --url WORDPRESS.WEBSITE.COM --enumerate u

    In this case, i tried to find the user on team3.pentest.id

  3. It will then show the result of the finding.
  4. It also shows some interesting finding on the website, such as its robot.txt content, server, étc.

Using Censys.io to Track IP Address

Censys.io

What is censys.io? Censys.io are used by company to find out what are exposed to public on their website. It can also be used to find the real IP address of a target.

Steps:

  1. Open censys.io on the browser
  2. You will find a form on the main page
  3. Enter the target website on the form and click the search button or type enter. In this example, I want to find team3.pentest.id IP Address.
  4. The result will show the IP Address of the target

Using pw-inspector and hydra to brute force password

Hydra is a parallelized login cracker that enables user to launch numerous protocols to attack. This tool makes it possible for researchers and security consultants to show how easy it would be to gain unauthorized access to a system remotely.

Steps:

Pw-Inspector

First, we use pw-inspector to create a file that meet your requirements for password. The list of command from pw-inspector are:

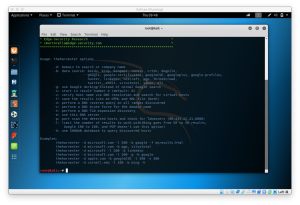
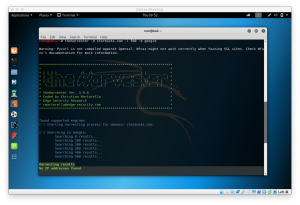
root@kali:~# pw-inspector
PW-Inspector v0.2 (c) 2005 by van Hauser / THC vh@thc.org [http://www.thc.org]

Syntax: pw-inspector [-i FILE] [-o FILE] [-m MINLEN] [-M MAXLEN] [-c MINSETS] -l -u -n -p -s

Options:
  -i FILE    file to read passwords from (default: stdin)
  -o FILE    file to write valid passwords to (default: stdout)
  -m MINLEN  minimum length of a valid password
  -M MAXLEN  maximum length of a valid password
  -c MINSETS the minimum number of sets required (default: all given)
Sets:
  -l         lowcase characters (a,b,c,d, etc.)
  -u         upcase characters (A,B,C,D, etc.)
  -n         numbers (1,2,3,4, etc.)
  -p         printable characters (which are not -l/-n/-p, e.g. $,!,/,(,*, etc.)
  -s         special characters - all others not withint the sets above

PW-Inspector reads passwords in and prints those which meet the requirements.
The return code is the number of valid passwords found, 0 if none was found.
Use for security: check passwords, if 0 is returned, reject password choice.
Use for hacking: trim your dictionary file to the pw requirements of the target.
Usage only allowed for legal purposes.

I use the rockyou.txt file available from Kali Linux by typing

pw-inspector -i /path/to/input.list -O /path/to/output -m minchar -M maxchar

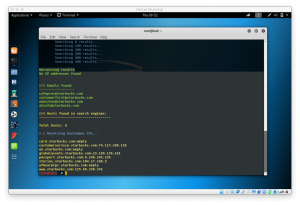
To check if it’s done, cd to the output path and find the file by typing

cd /path/to/output

find file.txt

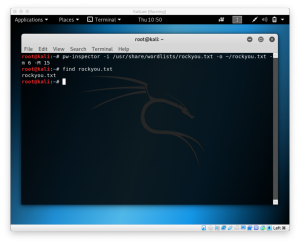
We’ll see our password list available if it returns the file.


THC-Hydra

After we’re done with our pw-inspector and created the password list, we can use hydra to brute force the password

to start using hydra, type

hydra -h

to find all available commands in your hydra

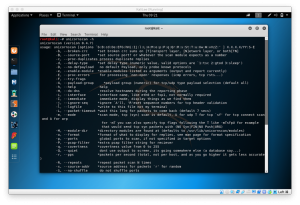
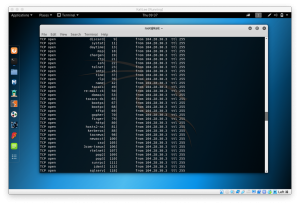
root@kali:~# hydra -h
Hydra v7.6 (c)2013 by van Hauser/THC & David Maciejak - for legal purposes only

Syntax: hydra [[[-l LOGIN|-L FILE] [-p PASS|-P FILE]] | [-C FILE]] [-e nsr] [-o FILE] [-t TASKS] [-M FILE [-T TASKS]] [-w TIME] [-W TIME] [-f] [-s PORT] [-x MIN:MAX:CHARSET] [-SuvV46] [service://server[:PORT][/OPT]]

Options:
  -R        restore a previous aborted/crashed session
  -S        perform an SSL connect
  -s PORT   if the service is on a different default port, define it here
  -l LOGIN or -L FILE  login with LOGIN name, or load several logins from FILE
  -p PASS  or -P FILE  try password PASS, or load several passwords from FILE
  -x MIN:MAX:CHARSET  password bruteforce generation, type "-x -h" to get help
  -e nsr    try "n" null password, "s" login as pass and/or "r" reversed login
  -u        loop around users, not passwords (effective! implied with -x)
  -C FILE   colon separated "login:pass" format, instead of -L/-P options
  -M FILE   list of servers to be attacked in parallel, one entry per line
  -o FILE   write found login/password pairs to FILE instead of stdout
  -f / -F   exit when a login/pass pair is found (-M: -f per host, -F global)
  -t TASKS  run TASKS number of connects in parallel (per host, default: 16)
  -w / -W TIME  waittime for responses (32s) / between connects per thread
  -4 / -6   prefer IPv4 (default) or IPv6 addresses
  -v / -V / -d  verbose mode / show login+pass for each attempt / debug mode
  -U        service module usage details
  server    the target server (use either this OR the -M option)
  service   the service to crack (see below for supported protocols)
  OPT       some service modules support additional input (-U for module help)

Supported services: asterisk afp cisco cisco-enable cvs firebird ftp ftps http[s]-{head|get} http[s]-{get|post}-form http-proxy http-proxy-urlenum icq imap[s] irc ldap2[s] ldap3[-{cram|digest}md5][s] mssql mysql ncp nntp oracle-listener oracle-sid pcanywhere pcnfs pop3[s] postgres rdp rexec rlogin rsh s7-300 sip smb smtp[s] smtp-enum snmp socks5 ssh sshkey svn teamspeak telnet[s] vmauthd vnc xmpp

Hydra is a tool to guess/crack valid login/password pairs - usage only allowed
for legal purposes. This tool is licensed under AGPL v3.0.
The newest version is always available at http://www.thc.org/thc-hydra
These services were not compiled in: sapr3 oracle.

Use HYDRA_PROXY_HTTP or HYDRA_PROXY - and if needed HYDRA_PROXY_AUTH - environment for a proxy setup.
E.g.:  % export HYDRA_PROXY=socks5://127.0.0.1:9150 (or socks4:// or connect://)
       % export HYDRA_PROXY_HTTP=http://proxy:8080
       % export HYDRA_PROXY_AUTH=user:pass

Examples:
  hydra -l user -P passlist.txt ftp://192.168.0.1
  hydra -L userlist.txt -p defaultpw imap://192.168.0.1/PLAIN
  hydra -C defaults.txt -6 pop3s://[fe80::2c:31ff:fe12:ac11]:143/TLS:DIGEST-MD5

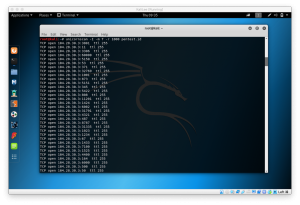
now, we’ll try to brute force the ftp on the other machine. To do so, type

hydra -t 10 -V -f -l root -P /path/to/your/passwordlist ftp://target.ip.address
  • -t 10 to run 10 tasks simultaneously
  • -V to run the verbose mode
  • -f  to finish the execution when password is found
  • -l root to specify the user root
  • -P /path/to/your/passwordlist to specify the password that will be used on cracking

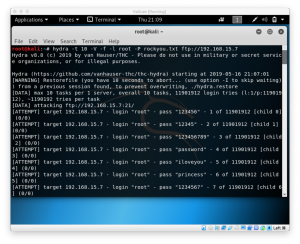
Now, we wait until password is found or process is done.

Using CUPP to Make Password dictionary

CUPP or common user password profiler is a tool to generate a wordlist based on the user profile such as their name, pets, etc. A weak password can easily be guessed by profiling the user.

Steps:

First of all, clone the Cupp.py from the GitHub by typing

git clone https://github.com/Mebus/cupp.git

then, cd to the directory by typing

cd /path/to/cupp

to run the cupp, type

python3 cupp.py -i

and fill all the fields about the user profile, if you don’t know about the user, you can skip by hitting the enter button

After you’re done filling the questions, it will generate an output as a .txt file with your target name as the filename

Using theHarvester to Gather Target Information

The objective of theHarvester is to gather emails, subdomains, hosts, employee names, open ports and banners from different public sources like search engines.

This tool is mainly used by pen tester to perform foot printing. It is also used to gather information about an organization before performing attacks

Steps:

type ‘theharvester’ on your Kali Linux machine to look at the options

to use theharvester, type

theharvester -d companyname.domain -l 500 -b google

Port Scanning using Unicornscan

One of the tools to run port scanning is Unicornscan. It is used to gather information about which port that is opened by using its TCP/IP stack.

Taken from the Kali Linux website about Unicornscan, the current version has hundreds of individual features, and the main set abilities of it are:

  • Asynchronous stateless TCP scanning with all variations of TCP Flags.
  • Asynchronous stateless TCP banner grabbing
  • Asynchronous protocol specific UDP Scanning (sending enough of a signature to elicit a response).
  • Active and Passive remote OS, application, and component identification by analyzing responses.
  • PCAP file logging and filtering.
  • Relational database output.
  • Custom module support.
  • Customized data-set views.

To use Unicornscan, open your Kali Linux machine, and type

Unicornscan -h

to check for the list of command

To check the port that is opened in an ip, type

Unicornscan -I -m T -r 1000 ip.address.targets
  • -I for immediately show opened port
  • -m T for TCP scanning method, if you want to scan UDP, then type -m U
  • -r 1000 to define many packets are sent per second

if you see, it will show all opened ports at the website of pentest.id, unicorn scan will later sort all open ports and its type

How DHCP assigns IP address

DHCP is an abbreviation of Dynamic Host Configuration Protocol, It is an application layer protocol used by host to automate the configuration of the network. It distributes the IP address for the network, subnet mask, and gateway address

What is Dynamic host configuration protocol?

  • Dynamic – Automatically
  • Host – Any computer that is connected to the network
  • Configuration – To configure a host means to provide network information(ip address,subnet mask,Gateway address) to a host
  • Protocol – Set of rules

Summing up, a DHCP server dynamically configures a host in a network.

Configuring host using DHCP
Requirements:

  • Leased IP Address – IP address to a host for a particular duration, for example, a day, an hour
  • Subnet Mask – For the network to know which network it is on
  • Gateway Address – This is the address for the Internet Service Protocol to enable the hosts to connect to the internet. This is used by hosts to connect to the internet

How DHCP server assigns IP address to a host?

  1. DHCPDISCOVER: When a new node is connected to the network, it broadcasts the DHCPDISCOVER message which contains the source address as 0.0.0.0 to every node on the network including server. DHCP server on receiving the message, returns the DHCPOFFER message to the requested host which contains the server address and new IP address to the node.
  2. DHCPOFFER: If there are multiple servers on the network, host receives multiple DHCPOFFER messages. It is up to the host to select a particular message.
  3. DHCPREQUEST:  The requested host on receiving the offer message, it again broadcasts the DHCPREQUEST message on the network with the address of the server whose offer message is accepted by the host. The server which pertains to that server address sent by the host checks whether the address to be assigned to the node is available in the data storage.
  4. DHCPACK : If the address is assigned , it marks the IP address in the storage as unavailable to ensure consistency. Now, the server sends DHCPACK packet to the requested host which contains network information(IP address, subnet mask, gateway address). In case, if the address is assigned to other machine meanwhile, then the server sends the packet DHCPNAK to the requested host indicating that the IP address is assigned to some other machine.
  5. DHCPRELEASE : And finally, If the host wants to move to other network or if it has finished  its work, it sends the DHCPRELEASE packet to the server indicating that it wants to disconnect. Then the server marks the IP address as available in the storage so that it can be assigned to other machine.